
CNC Machining Cost Reduction: 10 Design Tips to Lower Your Part Price
You got the quote back. It is higher than you expected. Now what?
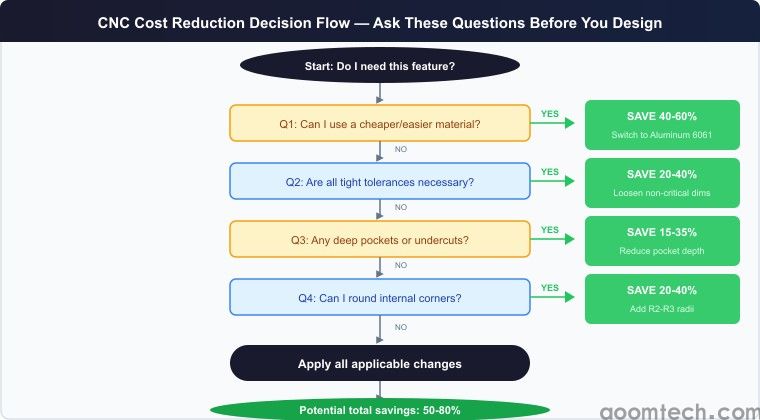
Before you start shopping around for cheaper shops — which usually means lower quality — ask yourself: can I design this part differently to cost less?
The answer is almost always yes. I have seen parts redesigned to save 40-60% without changing function. The trick is knowing what drives cost in CNC machining — and designing around it.
Here are 10 design changes that directly lower your CNC machining cost. These are not theory. These are the changes I have seen save real money on real production runs.
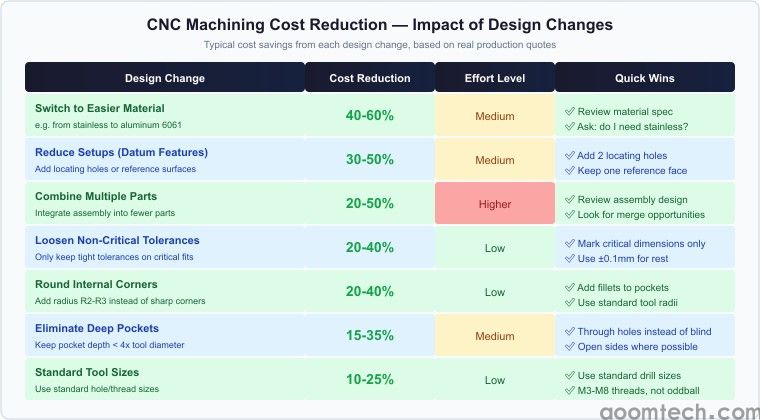
1. Reduce Setup Time with Datum Features
The most expensive part of any CNC job is not the cutting — it is the setup. Every time the part needs to be flipped, re-clamped, or re-indicated, you are paying for the machinists time and the machines idle time.
The fix? Add a machining datum — a flat surface, a pin hole, or a reference edge — that lets the machinist use a consistent zero point across operations. If you can get the part done in one setup instead of three, you just cut the cost by 30-50%.
I have quoted brackets where adding two locating holes to the design eliminated a second setup. The customer paid $50 more for the added features. They saved $400 per 100 parts on setup reduction. That is 8x ROI on the design change.
2. Avoid Deep Pockets and Cavities
Deep pockets kill cycle time. A pocket deeper than 4x the tool diameter requires multiple step-downs, each removing a thin layer. A 50mm deep pocket might take 10 passes instead of 2 for a 10mm deep pocket.
Design rule: keep pocket depths under 4x the tool diameter. If you need depth, consider whether the part can be designed as a through-hole or open-sided instead of a blind pocket.
3. Specify Realistic Tolerances
This is the single biggest cost driver. A ±0.1mm tolerance costs nothing extra. A ±0.01mm tolerance can double the machining cost. And ±0.005mm? Now you are talking CMM inspection and specialty tooling.
Ask yourself: does every dimension need to be tight? Most parts have 2-3 critical features. Everything else can be ±0.1mm.
4. Design for Standard Tool Sizes
Every time a part requires a non-standard tool, you are paying for tooling that may only be used for your part. Stick to standard sizes: 3mm, 6mm, 10mm, 12mm, 16mm, 20mm end mills. Use standard thread sizes: M3, M4, M5, M6, M8. Avoid oddball hole diameters.
5. Eliminate Sharp Internal Corners
Sharp internal corners require a small end mill that is slow and fragile. Instead of a square internal corner, add a radius — even R2 or R3. This lets the machinist use a larger end mill. I have seen cycle times drop 40% just by rounding internal corners from R0.5 to R2.
6. Combine Parts Where Possible
If your assembly uses multiple machined parts, ask if they can be combined. I quoted a project where a customers assembly had 7 separate CNC parts. We redesigned it as 3 parts. Machining cost went up 15%. Total assembly cost dropped 35%.
7. Use the Right Material
Aluminum 6061 machines 5-10x faster than stainless 304. The same part can cost 60% less in aluminum. If your part does not need the strength of stainless, switch. If it does not even need that, consider Delrin.
8-10. Quick Wins for Cost Reduction
8. Reduce wall thickness — 3mm+ is ideal for aluminum, below 1.5mm pays a premium.
9. Avoid undercuts — every undercut adds special tooling and setup cost.
10. Increase quantity — the jump from 10 to 100 parts can cut cost by 50% due to setup amortization.
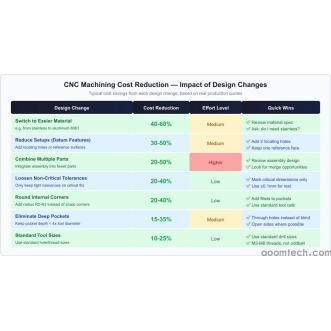
Cost Impact Summary
Here is what each design change saves based on real quotes:
| Design Change | Cost Reduction | Difficulty |
|---|---|---|
| Switch material | 40-60% | Medium |
| Reduce setups | 30-50% | Low |
| Loosen tolerances | 20-40% | Low |
| Round corners | 20-40% | Low |
My Take on CNC Cost Reduction
I have been on both sides of this. As a buyer, I have paid for parts that were overpriced because my design made them slow to machine. The best time to optimize for cost is during the design phase. Run through these 10 points before sending the drawing out for quotes.
Not sure which changes save the most? Send us the drawing. At AOOM Technology, we review every quote for cost optimization. Get your free quote and DFM analysis.
 CNC Machining for Consumer Ele
 CNC Machining Cost Reduction:
 CNC Machining Quality Control:
 CNC Machining for Aerospace: A